The Menu System
This section describes all menus and configuration items that are available on the MidiGurdy.
Please note that there are extended features and advanced settings that are only available via the Web Interface. Please see the The Web Interface on how to access and use it.
Home screen
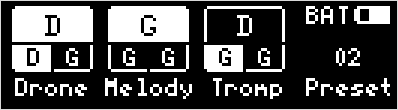
The home screen of the instrument menu
The home screen shows the most important information about the current setup of the instrument. The MidiGurdy will always return to the home screen after a configurable period of inactivity (see Configuration Menu).
The largest part of the display is taken up by the visualisation of the current string state and tuning. From left to right you see the state for the drone, melody and trompette strings. Each area is divided into three sections: the top row shows the first string of each type, the bottom left the second and bottom right the third string. Enabled strings are shown with black text on white background, disabled strings are shown with white text on black background. Each section contains the currently chosen note for that particular string.
As an example, the picture above shows that there are currently four active strings: the first and second drone string, the first melody string and the second trompette string. Drone strings are tuned to D, D and G, the melody strings are all tuned to G and trompette strings are tuned to D, G, and G. P lease note that the display does not show the octave of the current tuning. To see which octave a string is tuned to, you would have to open the respective String Setup Menu (see below) by pressing the buttons under the string label.
In the top right corner of the home screen you can see the estimated charge of the batteries as a small battery icon, as well as the currently active power source:
BAT – powered via batteries
EXT – powered via 5V power supply
USB – powered via USB connection
The bottom right corner shows the number of the last loaded preset. See below for an explanation of the preset system.
Available controls on the home screen:
Turn the rotary knob ROT left or right to open the Chien Sensitivity menu
Press the rotary knob ROT to cycle through the volume menus for Main Volume, Reverb Volume and Key Volume.
Chien Sensitivity

Probably one of the most important settings you will want to change on the MidiGurdy is the sensitivity of the chien. On an acoustic hurdy-gurdy, you would tighten or loosen the tirant for that. On the MidiGurdy, you simply turn ROT left or right when you are on the Home Screen.
Turn right to make the chien more sensitive (to start buzzing at lower cranking speeds), turn left to make it less sensitive.
Please note that the chien sensitivity affects all three trompette strings at the same time. There is currently no way to have individual chien sensitivities for trompette strings, but this might be added in a future version of the software.
Volume Menus

When you press the rotary knob ROT on the home screen, you reach the Main Volume menu. Turn ROT left and right to decrease or increase the main volume of the instrument.

Press ROT again to reach the Reverb Volume menu, turn it left and right to decrease or increase the sympathetic string reverberation volume. d

Press ROT again to reach the Key Volume menu, turn it left or right to decrease or increase the volume of the simulated mechanical key noise.
The BACK button will bring you back to the Home Screen.
String Menus
The String Menus are used to change the setup of all melody, drone and trompette strings of the MidiGurdy. You can access the String Menus by pressing one of the first three buttons D1 D2 D3 under the display, labelled “Drone”, “Melody” and “Tromp” (for Trompette).
These buttons always open up the String Menu, even when those labels are not shown above the buttons. Only if you see other labels above the buttons will their function be different.
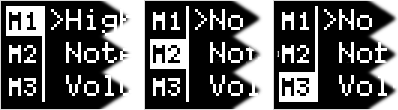
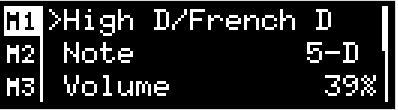
When you press a String Menu button once, you open the String Menu for the first string of the chosen type, as indicated by the bar on the left of the screen. Press it again to choose the second string, and again to choose the third string.
For example, if you press D2 once, “M1” is selected in the left bar, indicating that you are editing the first melody string. Press it again to to edit the second melody string (“M2” is selected in the left bar) and again to select to edit the third melody string (“M3” selected in the left bar). The drone and trompette buttons work in exactly the same way.
Melody String Items
In addition to the items common to all string types, the Melody String Menu contains a few additional items that are only relevant for melody strings:
Capo – Some acoustic hurdy-gurdies allow the player to lock one of the lower keys in a pressed state, effectively acting as a capo for all melody strings. This setting allows you to simulate that setup on the MidiGurdy, separately for each melody string.
Polyphonic – Contrary to most acoustic hurdy-gurdies, you can choose to play the melody strings polyphonically. This means that when you press two or more keys at the same time, you will hear all notes simultaneously instead of just the note of the highest key.
Mode – This setting controls how the physical controls (keyboard and crank) affect the sound generation on this string:
“Hurdy-Gurdy”: this mode simulates a hurdy-gurdy. The string will only produce a sound if the crank is turned and the keyboard reacts similar to an acoustic hurdy-gurdy. This mode is the default for all “generic” Soundfonts (i.e. Soundfonts which were not specifically created for the MidiGurdy).
“MidiGurdy”: this mode is very similar to the “Hurdy-Gurdy” mode, but adds extended sound control via the keyboard. This mode is mostly useful for Soundfonts which have been specifically created for the MidiGurdy and is the default for those Soundfonts.
“Keyboard”: in this mode, the string can be played as if the MidiGurdy were a piano. Sound is only controlled via the keyboard and you don’t need to turn the crank to hear a sound. The keyboard is velocity-sensitive, which means that the volume of the sound is dependent on how fast you press the keys.
Preset Menu

Presets allow you to save and load the setup of the instrument very quickly. The MidiGurdy comes with a few pre-configured presets, but you can create your own presets or edit existing presets to your liking. To open the Preset Menu, press D4 and the list of presets will appear.
Loading a preset
To load a preset, select any numbered preset from the list with the rotary knob, then do a short press on the rotary knob.
Saving a preset
To save the current instrument setup to a new preset, go to the last entry in the preset list called “New preset…” and press the rotary knob.

A new screen will appear in which you can enter a name for the new preset. The first character of the name is highlighted and can be edited by turning ROT left or right to move though the available characters. Pressing the rotary knob after choosing a character moves to the next character position.
At the bottom of the screen you see new labels for the four buttons under the display:
DEL |
< |
> |
SAVE |
D1 |
D2 |
D3 |
D4 |
Press the buttons under the arrows < and > to change which character you are currently editing (moving the cursor).
Press the button under DEL to delete the currently selected character and shift all following characters to the left by one place.
Press the button under SAVE to accept the current name and save the preset.
You don’t have to enter a name to save a preset. In that case, the preset is called “Unnamed” in the list of presets and can only be identified by it’s number.
Editing a preset

To edit an existing preset, select the preset you want to move with the rotary knob and then do a long press on ROT to open the Edit Preset Menu. The chosen preset name will be displayed, along with four options: “Move”, “Rename”, “ Replace” and “Delete”. Select one of the options with the rotary knob or press BACK to cancel the operation.
Moving a preset
When you choose “Move” in the Preset Edit Menu, the preset list will appear with the chosen preset highlighted. Use the rotary knob to move it to the desired position, then do a short press on the rotary knob to save the new position. Or press the BACK button to cancel the operation.
Renaming a preset
When you choose “Rename” in the Preset Edit Menu, you will be presented with a screen where you can modify the preset name. This screen works just in the same way as if you would save a new preset (see “ Saving a preset” above).
Replacing a preset
When you choose “Replace” in the Preset Edit Menu, the current instrument setup will be stored over the preset you are currently editing, replacing everything with the new setup.
Deleting a preset
When you choose “Delete” in the Preset Edit Menu, the currently selected preset is deleted immediately and the following presets are shifted up automatically.
Configuration Menu
The configuration menu contains many settings that affect the instrument as a whole:
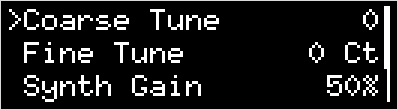
Coarse Tune – shifts the tuning of all strings of the MidiGurdy up or down the given number of semitones.
Fine Tune – shifts the tuning of all strings of the MidiGurdy up or down the given number of cents. The default tuning (Fine Tune = 0, Coarse Tune = 0) of the instrument with the supplied Soundfonts is A=440Hz.
Pitch Bend – controls the amount of pitch bend in cent that you will hear when pressing a key harder or softer. Increase this value for more pitch bend, decrease it for less. 100 cent equal one semitone.
Synth Gain – Controls the amount of gain (amplification) used in the internal synthesizer. Depending on the sounds you have chosen for the strings and the volume of the samples in the Soundfont, you might have to increase the gain to reach the desired volume or decrease the gain to avoid digital distortion and clipping in the synthesizer.
Keynoise… - opens a menu similar to the String Menu where you can choose the sound of the key noise channel and change the volume and stereo balance of the key noise.
Brightness – Controls the brightness of the display.
Disp. Timeout – Controls the number of seconds of inactivity after which the menu system will return to the Home Screen automatically.