Getting to know the MidiGurdy
In many ways the MidiGurdy works very similar to other hurdy-gurdies, but there are a few differences that you should be aware of. The MidiGurdy also offers many functions that you won‘t find on an acoustic instrument, which this manual will explain in detail.
In this section we will explore the mechanical features of the instrument and learn about the user controls and the connectors available on the MidiGurdy.
Mechanical Features
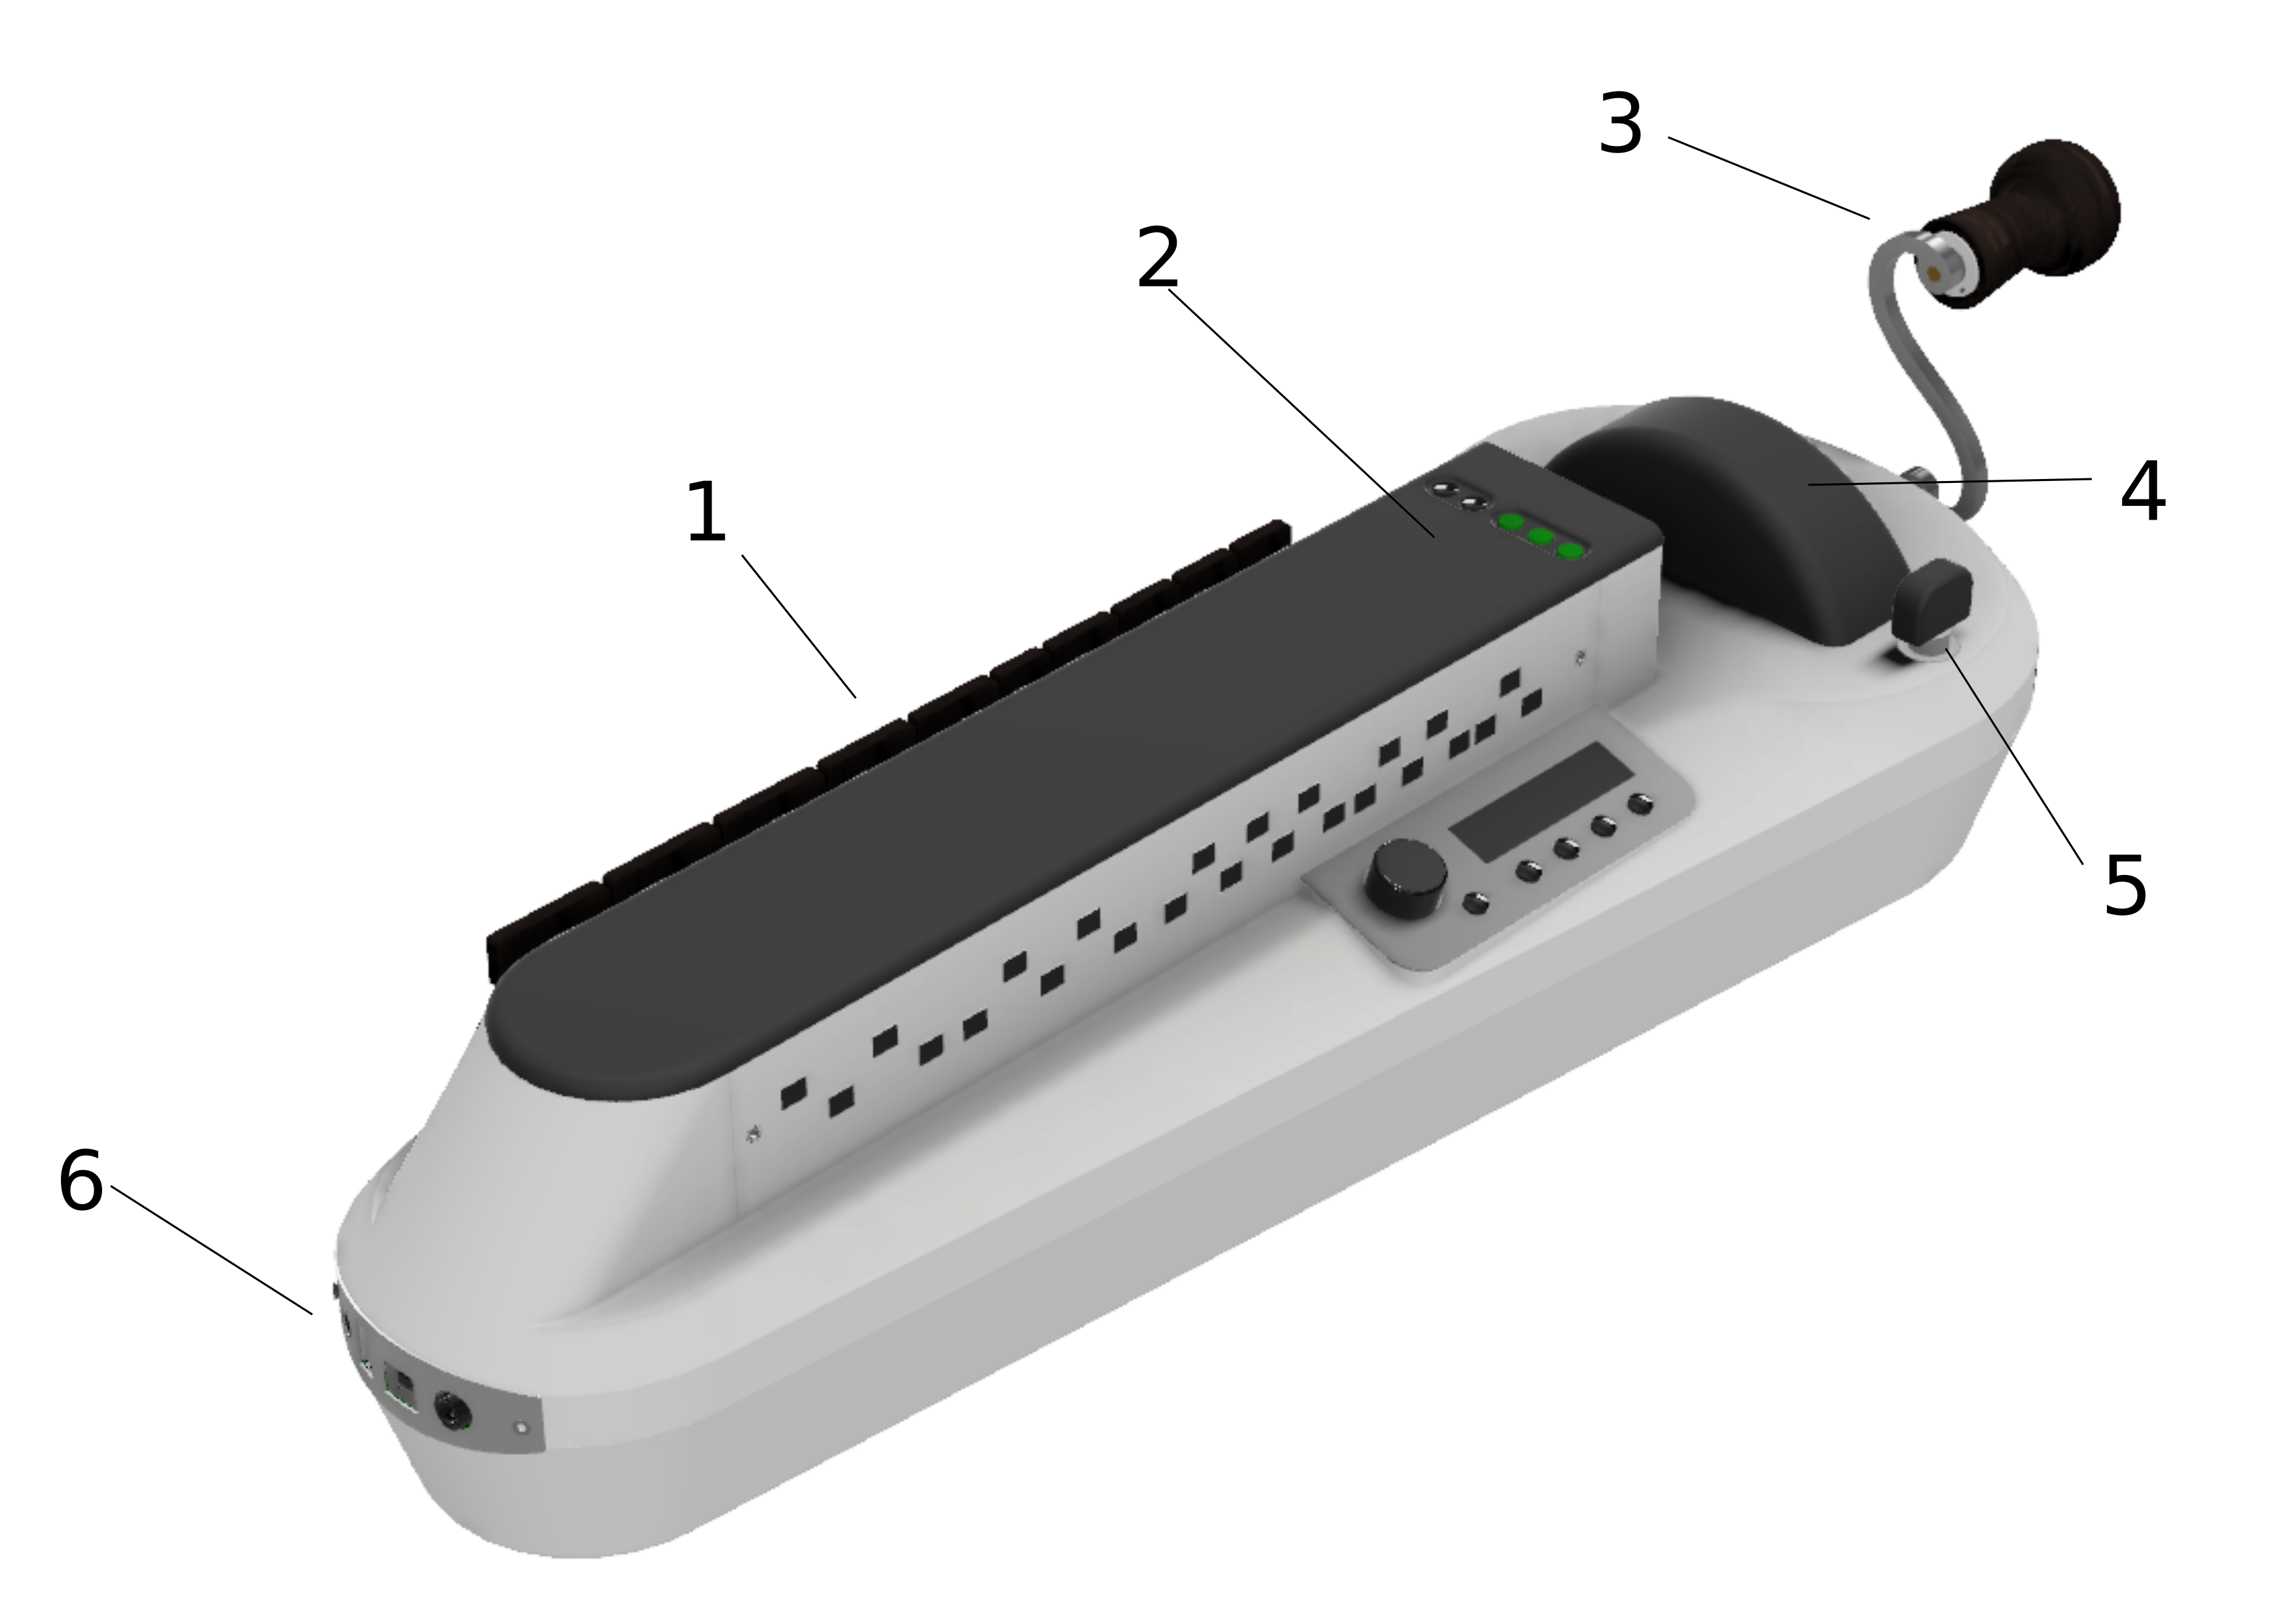
The mechanical features of the MidiGurdy
(1) Keyboard
The keyboard of the MidiGurdy works like most hurdy-gurdies and uses gravity for the keys to fall back into their original position. This requires you to tilt the instrument forward while playing.
(2) Tangent box lid
The tangent is covered by a wooden lid that is held in place using four magnets.
(3) Crank
The crank also works like you would expect from a hurdy-gurdy. You can turn it forwards, backwards, shake it and use it to sound the trompette by giving shorter or longer impulses while turning. The turning speed also affects the volume of the instrument.
(4) Wheel Cover
The wheel cover can be lifted by grabbing it on both sides and simply lifting it upwards with a little force. Once the cover is removed, you can grab the wheel to attach or remove the crank. To close the cover again, carefully insert it into the cut-out around the wheel and push down with a little force until you hear it snap into place.
(5) Wheel Brake Control
The black knob right next to the wheel cover controls the wheel brake. It is used to adjust the amount of resistance that you feel while turning the crank, simulating strings pressing down onto the wheel. Turn right to pull it tighter and increase the required force, turn left to loosen the brake and reduce the required force. Always turn the crank while adjusting the brake to avoid overloading the wheel and axle! Excessive force on the brake might damage the parts of the braking system.
(6) Front panel connectors
The front panel contains all connectors used to interface the MidiGurdy with external components. We will have a closer look at the individual input and output ports in the next section. Instrument strap pins There are three instrument strap pins: one at the front and two pins at the back.
Tangent box lid buttons
There are two distinct sections that are used to control the many different functions of the MidiGurdy: the five buttons in the tangent box lid and the main user interface.
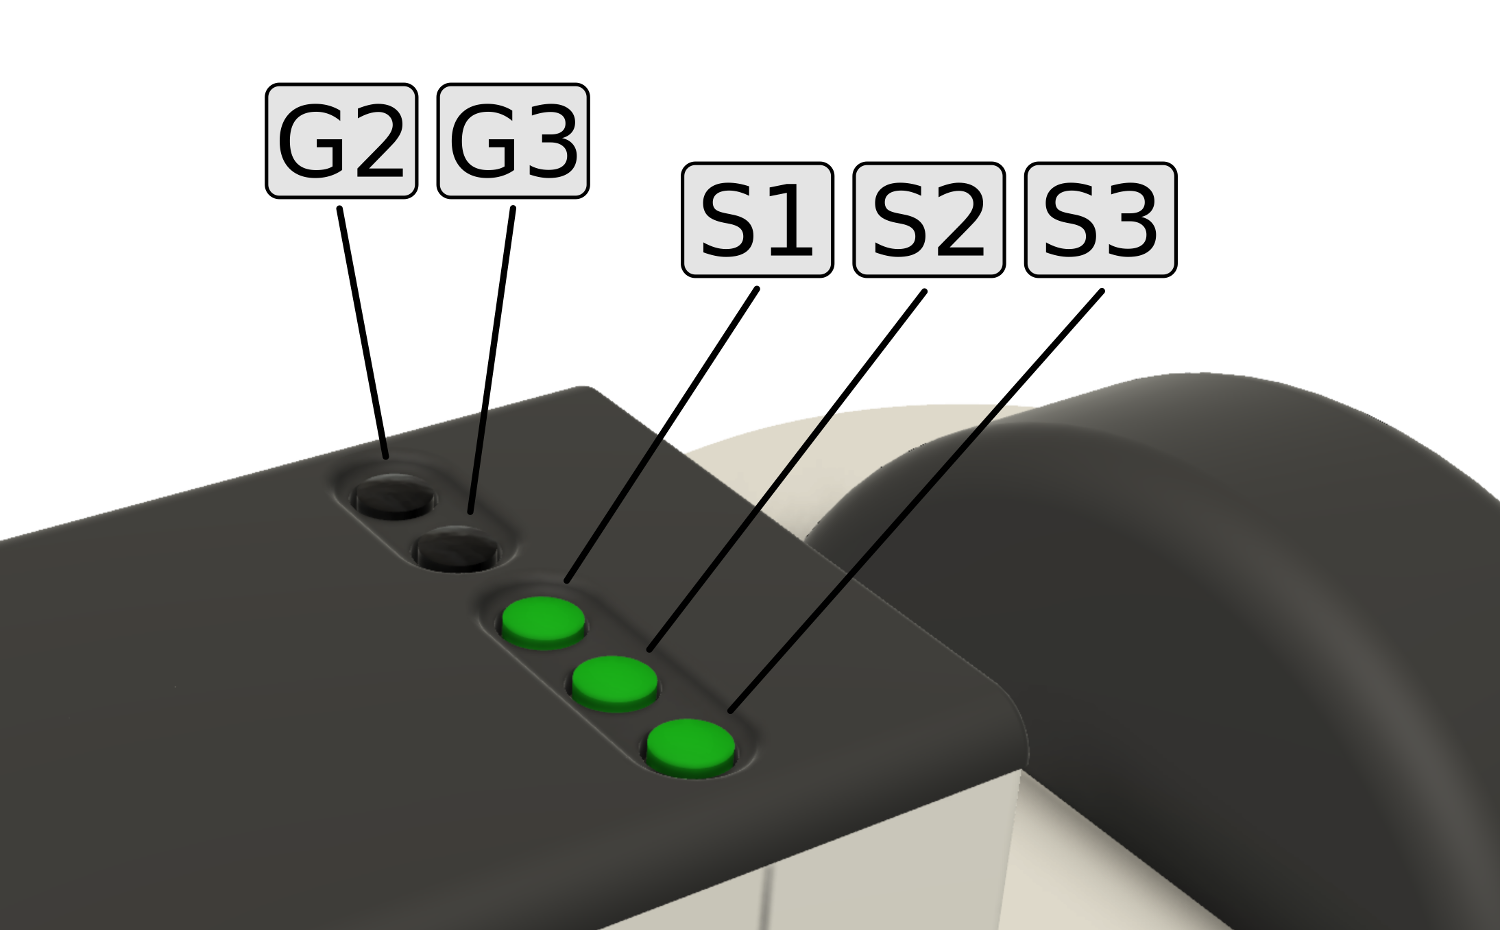
Buttons in the tangent box lid
The lid of the tangent box contains five buttons, arranged in two groups. Let’s look at the group of three buttons closest to the player first, called the “String Buttons“.
The String Buttons (S1 S2 S3)
These buttons are used to switch individual strings on and off (lift them on and off the wheel). The order of the buttons follows the string positions on an acoustic hurdy-gurdy:
S1 drone string (closest to the keyboard)
S2 melody string (centre)
S3 trompette string (closest to the player)
Press any of these buttons, turn the crank and notice how the string sound gets switched on or off. An illuminated button means the string is currently switched on.
The Group Buttons (G2 G3)
The two black buttons on the tangent box lid are called the “Group“ buttons. The MidiGurdy has a total of nine strings but only three String Buttons for switching the strings on and off. This is why the Strings are arranged in three groups:
Group 1 – Drone 1, Melody 1, Trompette 1 (activated by default)
Group 2 – Drone 2, Melody 2, Trompette 2 ( activated with G2)
Group 3 – Drone 3, Melody 3, Trompette 3 (activated with G3)
If you only press the String Buttons S1, S2 or S3 you are controlling the strings in Group 1, as this group is active by default (i.e. if you don’t press any of the Group Buttons.)
If you want to control the strings in Group 2 instead, you simply hold the G2 button while pressing any of the String Buttons. Or hold the G3 button while pressing the String Buttons to control the strings in Group 3.
As soon as you press one of the Group Buttons, the illumination of the String Buttons changes to indicate the on/off state of the drone, melody and trompette string in that group.
Pressing the Group Buttons only affects which strings you switch on and off with the String Buttons. They have no other effect on the instrument. You can mix and match strings from all groups while playing, or even play all nine strings simultaneously.
User Interface
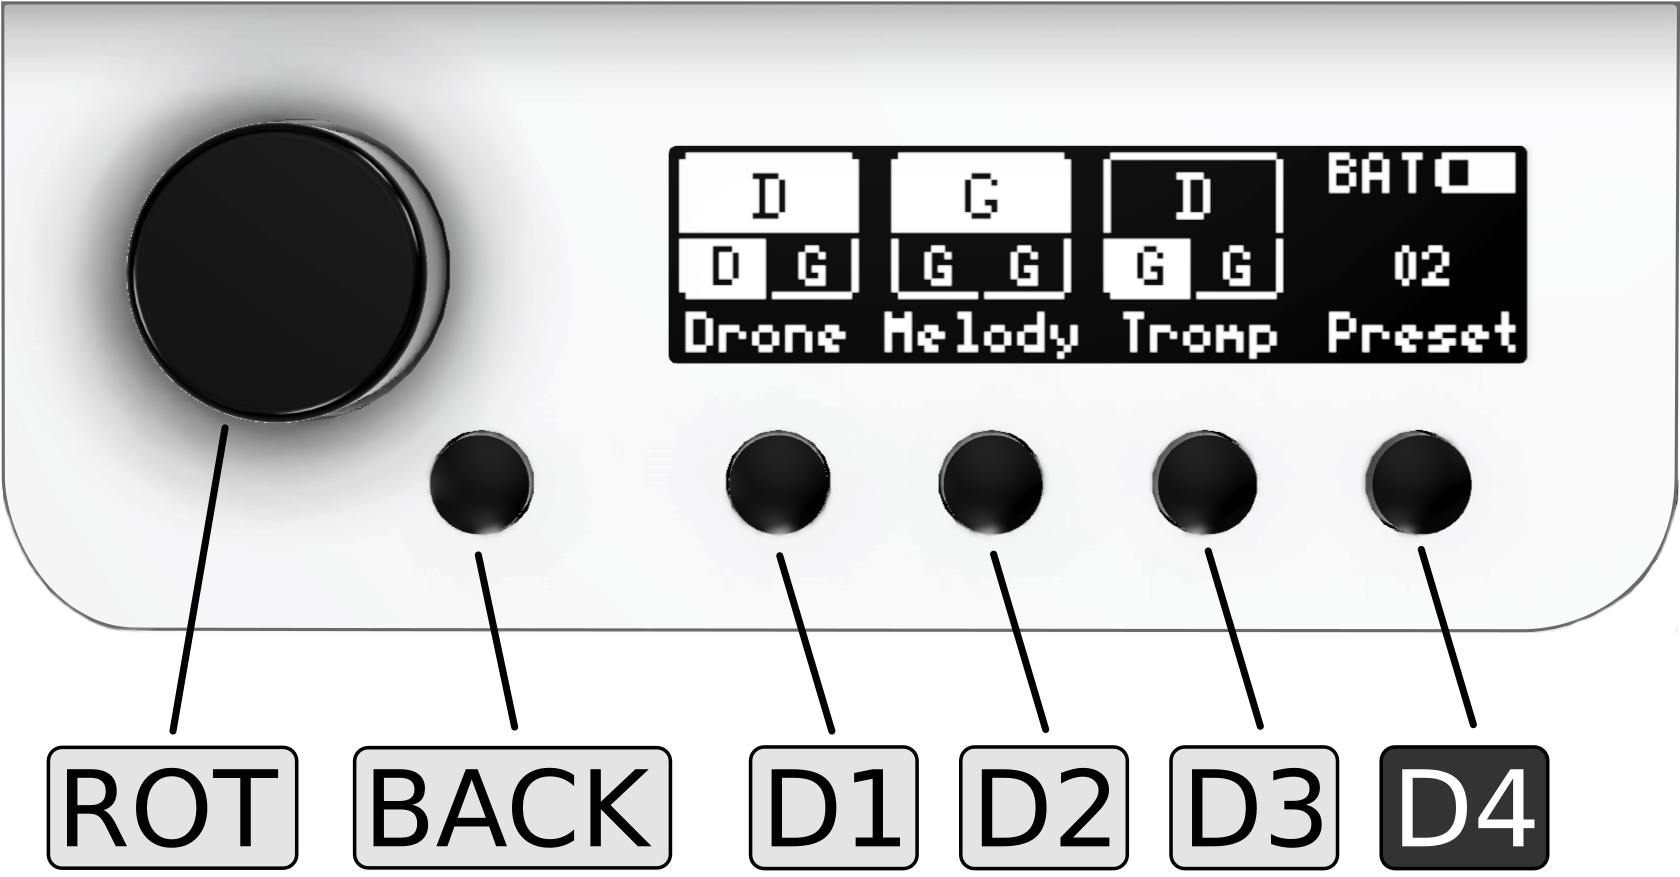
The main user interface of the MidiGurdy
The main user interface of the MidiGurdy consists of the display, a rotary knob and five buttons. First a short overview explaining the most important functions of the interface. For a detailed description of the settings and the menu system, please see the section The Menu System.
Display
The display of the MidiGurdy is used to show you the current setup of the instrument and is used to display all settings and menu items. By default it shows the so called “Home Screen“ which informs you about the current tuning and on/off state of all strings, the currently selected preset, how the instrument is powered and the estimated battery charge in case you are running on batteries (see The Menu System for more details).
Rotary knob (ROT)
You can turn this knob left and right and also press it like a button. Turning the knob is used to navigate the menu system or to increase or decrease values. Pressing the knob usually selects a menu item or confirms a changed value.
Back button (BACK)
The back button is right next to the rotary knob. Regardless on where you are in the menu system, pressing this button will always cancel the current selection or operation, bring you back to the previous screen and eventually back to the Home screen.
Display Buttons (D1 D2 D3 D4)
The four buttons under the display are called the “Display Buttons” and activate different functions depending on the currently active menu. By default, the first three buttons activate the configuration menus for
the drone strings D1
the melody strings D2
the trompette string D3
as indicated by their labels in the display on the Home Screen.
The rightmost button D4 is also called the “Power / Settings” button. As the name suggests, this button is used for multiple purposes:
Switching the MidiGurdy on and off:
Hold this button for about 1 second to switch the instrument on
Hold this button for about 4 seconds to switch the instrument off again
Hold this button for about 8 seconds and release it again to do a forced restart of the instrument. Use this if the MidiGurdy has locked up and doesn’t react to any user input any more (which hopefully will never happen!)
Opening the Presets and Settings menus with a short press of the button